

Web Programming
So with a brief overview of html, css and python it is time to put everything together.
If you’ve never programmed something for the web just remember:
THE INTERNET IS JUST A BUNCH OF COMPUTERS ALL TALKING TO EACH OTHER
There is no special “cloud” machine or “server.” These are all just words that describe COMPUTERS. It’s not much different from sending a hand written letter from one house to another house. The mailman is just your internet cable and some electricity.
We have to command our computer to send information (think hand written letter) using a request called GET. So if you go inside your browser like safari, edge, chrome, firefox, whatever, that bar at the top for web addresses is where you send GET requests. You are saying “go GET me the information from google.com.” When you google cats the bar changes to some funky address that is saying “GET me cats.” (https://www.google.com/search?q=cats&oq=cats&aqs=chrome.0.69i59j0l4j69i61.3015j0j8&sourceid=chrome&ie=UTF-8)
On our computer we might have a word document locally. If we open it we get the information on the screen so we can read it. It is easy in our case to write more stuff onto the document and save it. How do we do this on the web?
There are a few different commands besides GET but the next one you should know is called POST. If I have data somewhere on the internet, meaning not on my computer but on the web, I can add data to it by using a POST type request. It is still a web address but it has some data tied to it that will be saved on the other end. You can also get a response from a POST request. Usually it will be a message that your data was either saved, or something went wrong.
Web requests have headers. I’m on Firefox so if I make a GET request, I can inspect by right clicking and choosing inspect. This is similar on a lot of browsers. Here is how I found the headers:
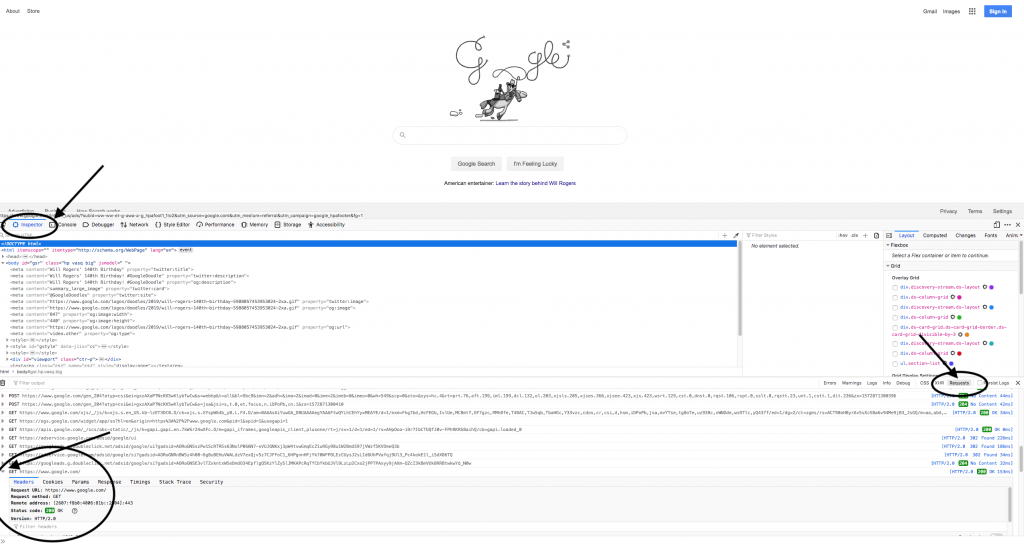
So we can see in my case we’re using HTTP/2.0 the response code was 200 which means all is good and our content type is text/html; charset=UTF-8.
UTF stands for Unicode Transformation Format and after spending the past hour looking this up I think I get how it works. I’m probably not 100% but this is the gist. Please leave a comment if you have any additional info on the topic that would help others. Here is an image I put together to help visualize what is happening:

utf-8 is the encoding lookup table that turns a character code into binary for a computer to read or pass back out to Unicode. Unicode (a character set) takes the character code and maps it to a lookup table that has the actual character we display on the page using a typeface or font.

I hope that made sense. If it doesn’t please let me know in the comments.
HTML
HTML holds 2 types of info. Info we see and info we don’t see. Here is a sample from the CS50 lecture notes:
<!DOCTYPE html>

<html>
    <head>
        <title>hello, title</title>
    </head>
    <body>
        hello, body
    </body>
</html>
The browser program is going to interpret this starting at the top. The first line lets the browser know we are dealing with HTML5, the current standard. Next we have <html> which starts and ends all the info we’re going to have on our page.
<head> is where the browser gets info regarding the title of our page, scripts we want to run, and CSS.
<body> is where we hold the material that can be viewed on the screen by our user. Inside the body we can have website titles, images, text, links and anything else you’ve ever seen on a webpage.
Notice how everything has a closing tag and has a nested structure.
CSS
CSS to style our page. We can change the character font, color, add borders, background images and even animations. When you hover your mouse over a button, and the button on the page looks slightly different when you hover over it, that is CSS. Here is some example code:
You can put css in the <head> section of your html file, or reference a separate .css file. The example file above can be opened using your browser without any other files. Try hovering over the button and last list item.
In CSS the first letter stands for cascading. It’s important you know that in css the rule closest to the bottom will always been the final say.
Notice on line 21 of my example I set the font to 1000000000px! Then on the following lines I change the font. So if a css rule is targeting the exact same element in the html, the last rule will win. Remember I wrote exact. If one rule is li and the next rule is li:first-child THEY ARE NOT EXACTLY THE SAME. So the cascading rule of last is not true.
To learn more I recommend W3Schools CSS tutorials, they are excellent.
Dynamic content with python
This look complicated but lets try to break this down. I was stumped at first but after posting some questions on reddit I figured it out:
# Implements a web server

from http.server import BaseHTTPRequestHandler, HTTPServer


# HTTPRequestHandler class
class HTTPServer_RequestHandler(BaseHTTPRequestHandler):

    # GET
    def do_GET(self):

        # send response status code
        self.send_response(200)

        # send headers
        self.send_header("Content-type", "text/html")
        self.end_headers()

        # write message
        self.wfile.write(bytes("hello, world", "utf8"))


# configure server
port = 8080
server_address = ("0.0.0.0", port)
httpd = HTTPServer(server_address, HTTPServer_RequestHandler)

# run server
httpd.serve_forever()
Ok after going through the notes I understand what is happening. Seeing a class with a do_GET method and not finding it being called in the program was really confusing at first.
do_GET gets called when the user goes to the browser and loads that webpage (makes a GET request).
wfile was confusing at first too, but it’s a file handler used by the HTTPServer class. It requires a bytes object so python has a helpful function that takes in a string and an encoding (utf-8). So we have above the example of ‘hello world’ but we can also create our own file handler, insert it into the bytes function with the read() method and serve up our text file to the webpage.
Here is that version:
# Implements a web server

from http.server import BaseHTTPRequestHandler, HTTPServer


# HTTPRequestHandler class
class HTTPServer_RequestHandler(BaseHTTPRequestHandler):

    # GET
    def do_GET(self):

        # send response status code
        self.send_response(200)

        # send headers
        self.send_header("Content-type", "text/html")
        self.end_headers()

        # write message
        # file handler gives us a stream. bytes turns it into a bytes object
        # we can pass the file handler, a string of text
        # just remember to pass the encoding type utf8!
        f = open("test.txt")
        self.wfile.write(bytes(f.read(), 'utf8'))
        f.close()


# configure server
port = 8080
server_address = ("0.0.0.0", port)
httpd = HTTPServer(server_address, HTTPServer_RequestHandler)

# run server
httpd.serve_forever()
I created a file called test.txt in the same directory for this test. Next I’ll try an html file:
# Implements a web server

from http.server import BaseHTTPRequestHandler, HTTPServer


# HTTPRequestHandler class
class HTTPServer_RequestHandler(BaseHTTPRequestHandler):

    # GET
    def do_GET(self):

        # send response status code
        self.send_response(200)

        # send headers
        self.send_header("Content-type", "text/html")
        self.end_headers()

        # write message
        # file handler gives us a stream. bytes turns it into a bytes object
        # we can pass the file handler, a string of text
        # just remember to pass the encoding type utf8!
        f = open("test.html")
        self.wfile.write(bytes(f.read(), 'utf8'))
        f.close()


# configure server
port = 8080
server_address = ("0.0.0.0", port)
httpd = HTTPServer(server_address, HTTPServer_RequestHandler)

# run server
httpd.serve_forever()
Here is my html file:
<!DOCTYPE html>
<html>
<head>
	<title>Wow CATS</title>
</head>
<body>
	<h1>CATS ARE AWESOME!!!</h1>
	<p>Hello world this is my cats page please subscribe for lots of cats</p>
	<br>
	<img src="https://inteng-storage.s3.amazonaws.com/img/iea/4N610VqxGJ/sizes/cat-cloning_resize_md.jpg">
</body>
</html>
The result:

So far we’ve created a static page but now we have to go even deeper and build dynamic pages. This is a pretty dense topic and we’ll soon see the differences. Here is a quick read that explains the differences well.
Flask – a python web framework
Make sure to type pip install flask in the terminal before getting started.
Let’s start with a simple example, straight from the Flask website, which you can find here.
I’ve made a folder called flask_example, and inside a file called mysite.py. Inside that file are a few lines of code:
from flask import Flask

app = Flask(__name__)

@app.route('/')
def hello_world():
	return 'Hello, CS50!'
If I tried to run this in the terminal by typing flask run, I will most likely get this message:
 * Environment: production
   WARNING: This is a development server. Do not use it in a production deployment.
   Use a production WSGI server instead.
 * Debug mode: off
Usage: flask run [OPTIONS]

Error: Could not locate a Flask application. You did not provide the "FLASK_APP" environment variable, and a "wsgi.py" or "app.py" module was not found in the current directory.
It wants us to create an environment variable, which is a variable our operating system holds (not our program). Flask reaches to the OS for this variable to reference our file.
We can create environment variables by using the export command in the terminal.

So lets create the FLASK_APP environment variable that is the name of our program. In this example the file i’m working in is called mysite.py

Now when I run the command flask run I get this:

If I hover of the website address and click open I get this:

Now that we’ve created this simple example lets follow the lecture notes.
Flask continued (lecture notes)
I’m going to rename mysite.py to application.py so it matches up with the notes. Then i’m going to create a folder called templates. The notes are a little confusing here but to clear it up here is the directory structure:
- flask_example
- application.py
- templates
So flask_example is the main folder, which has application.py and the templates folder inside of it.
first we have to make sure to reset our environment variable!!!!
In the terminal type export FLASK_APP=application.py
Next, inside the templates folder i’ll create a new file called index.html that has this html:
<!DOCTYPE html>

<html>
    <head>
        <title>hello, title</title>
    </head>
    <body>
        hello, body
    </body>
</html>
I’m going to replace the code in application.py with this:
from flask import Flask, render_template

app = Flask(__name__)

@app.route("/")
def index():
    return render_template("index.html")

@app.route("/zuck")
def zuck():
    return render_template("zuck.html")

@app.route("/login")
def login():
    return render_template("login.html")
Next i’ll run the flask run command in the terminal:


Now inside of templates create a zuck.html file with this html:
<!DOCTYPE html>

<html>
    <head>
        <title>hello, title</title>
    </head>
    <body>
        hello, this is the zuck page!
    </body>
</html>
Enter flask run in the terminal again and open the website URL. Then add “/zuck” to the end of the url and you will get this result:

Error handling and tracebacks with flask
You can skip this and just run these commands:
touch ~/.bash_profile && echo export FLASK_DEBUG=1 > .bash_profileThen restart the terminal for it to work. Click here for the next section of text.
This was a huge pain to get working with CS50 IDE. I spent about an hour on this because I really wanted that nice traceback feature right in the browser. Turns out there is another environment variable that needs to be set similar to FLASK_APP. I found this in the flask documentation:
To enable all development features (including debug mode) you can export the FLASK_ENV environment variable and set it to development before running the server:
$ export FLASK_ENV=development
$ flask run
(On Windows you need to use set instead of export.)
This does the following things:
- it activates the debugger
- it activates the automatic reloader
- it enables the debug mode on the Flask application.
You can also control debug mode separately from the environment by exporting FLASK_DEBUG=1.
It turns out FLASK_ENV wasn’t the answer, I just needed that last little part FLASK_DEBUG=1. Or to be exact export FLASK_DEBUG=1
To make it more frustrating I had to do this every time I opened a new terminal. To fix this I wrote this in the terminal:
touch ~/.bash_profile && echo export FLASK_DEBUG=1 > .bash_profileI’ve run into .bash_profile in the past and I recommend doing a quick google how it works when you get a chance.
Now open a fresh new terminal, close the old one, and try to go to the login.html (make sure in the templates folder you delete login.html so it is not there since we’re trying to mock an error situation). You should get that awesome jinja2 traceback!
Frosh IMs – what it means
I have no idea what Frosh is let me look that up…
Ok google tells me it is a slang word for a first year student (like a freshman).
Ok… fine.
IM’s stands for intramurals which are sports organized within an institution. Fun fact, the word is derived from the Latin intra muros which means “within walls.” Now that i’ve unpacked the heading of this section let’s get down to the programming part:
File structure is similar to the previous example:
- froshims0/
- application.py
- templates/
- failure.html
- index.html
- layout.html
- success.html
If we go through each file in the link provided here, we can go into each file, copy the code and run it to get the form:

Next I would like you to open the inspector in your browser by right clicking and choosing inspect. This is a little different for each browser. I’m using chrome in this case:

Next I want you to click on the “Network” tab:

A post request means the form values are sent in the HTTP body data. What does that mean? Even if we can’t see the body data doesn’t mean the other end doesn’t receive and read it. Lets think of it this way:

When I open my browser it’s like walking into a post office, where I get my mail. When I go to the counter, the clerk asks for information necessary to retrieve my mail. On my computer, when I type google.com it’s like asking the post office worker “please get me google.com.” Once that post office worker brings me an envelope let’s imagine it like this for google.com:

Now if I take this same idea and fill out a form on a webpage. I can use a GET request or a POST request. Using GET I pass in the form values right into the URL address. When filling out the frosh form using the method GET, and hitting submit the url will change to this:
https://792cdab9-edb1-4a25-a6df-87b8146cafcf-ide.cs50.xyz:8080/register?name=john+smith&dorm=CanadayNotice the last part: ?name=john+smith&dorm=Apley+Court
So if we look back at the envelope image it might look like this:

This is usually ok for quick and dirty apps that don’t need to be secure with data. A form about if you like cats or not might be ok for the GET method.
Otherwise we have to use POST. So if i change my code back so I use the POST method, which is how it was written by default, my url looks like this after submitting:
https://792cdab9-edb1-4a25-a6df-87b8146cafcf-ide.cs50.xyz:8080/registerSo where did my form values end up?
THE SAME PLACE WHERE YOUR BROWSER STORES PAGE DATA. Like LITERALLY THE SAME PLACE. I had no idea for the longest time, because you can’t see what the computer (server) sees on the other side. It uses that space because you can store tons more data. Think about how many images, videos, text you view on the webpage body. That allows forms to take advantage of all that space to then store things to the computer on the other end of the form submission.
So here is what a post request looks like:

Flask routes and more
Let’s look at the application.py file in our lecture notes:
from flask import Flask, render_template, request

app = Flask(__name__)

@app.route("/")
def index():
	return render_template("index.html")

@app.route("/register", methods=["POST"])
def register():
	if not request.form.get("name") or not request.form.get("dorm"):
		return render_template("failure.html")
	return render_template("success.html")
When we use from flask we’re saying from the flask file, give me access to the Flask class. Python classes by convention start with a capital letter. We are also importing the render_template function, and the request object, which has methods we can use to GET and POST things.
Next we have this funky @app.route(“/”), followed by a function def.
@app.route("/")
def index():
	return render_template("index.html")
This is called a decorator. Let’s break down what that means.
A quick peak at decorators, factories and wrapping functions.
Let’s jump right into this magic™
def returnPositiveNumber(number):
	if number > 0:
		return number
	else:
		return 1
Here we have a simple function. It will always return a positive number. If it’s zero or a negative number it will return 1. Easy. Our function takes in one arguement num as it’s only argument.
Python treats functions as first-class-objects, which means you can put them just about anywhere, including as arguments to other functions.
Check this next piece out:
def plusNineThousandDecorator(function):
	def wrapper(number):
		return function(number) + 9000
	return wrapper
PlusNineThousand takes a function as its argument. So we’re going to pass our returnPositiveNumber function into it. How does this look if we try to print something out?
SUPER IMPORTANT! When we use a function as an argument we are NOT calling the function, we reference it as an object which is super strange at first sight. NO () are used!
test = plusNineThousand(returnPositiveNumber)Look back to our plusNineThousand definition and check out the last line. It returns decorator. So what is decorator? It’s a function. So test is a function. What does it do? How does it work? Take a look at it’s definition:
return function(number) + 9000It takes the same argument as our original function. So we need to run it as test(num). But now it adds 9000 to the returned result.
Let’s try it out:
print(test(42))
#result is 9042

print(test(-1))
#result is 9001
test is now a function that takes our original function which returned num and added a piece of new functionality, which is adding 9000 to it and returning it back.
When using decorators it is common to modify the original function like this:
returnPositiveNumber = plusNineThousandDecorator(returnPositiveNumber)Now our original function is what it used to be plus it adds 9000 to everything.
print(returnPositiveNumber(42))
#result is 9042
We can use some syntax sugar to make our ugly:
returnPositiveNumber = plusNineThousandDecorator(returnPositiveNumber)Into this:
@plusNineThousandDecorator
def returnPositiveNumber(number):
	if number > 0:
		return number
	else:
		return 1
Make sure the decorator function is before the function you modify. Also the decorator @ has to be placed on the line before the function like shown above.
Here is the entire program:
Going deeper, we can assign arguments to our @plusNineThousandDecorator. We can only modify before and after our modified function so let’s try to add some html tags to the front and back of our number.
So we can not pass arbitrary arguments to our decorator. The decorator returns our original function wrapped in some other stuff.
Now we need a “factory” that returns a decorator while passing some arguments in the process.
So let’s “wrap” our decorator function in a decorator factory:
def decoratorFactory(htmlTag):
	def plusNineThousandDecorator(function):
		def wrapper(number):
			return f"<{htmlTag}>{function(number) + 9000}</{htmlTag}>"
		return wrapper
	return plusNineThousandDecorator


@decoratorFactory("h1")
def returnPositiveNumber(number):
	if number > 0:
		return number
	else:
		return 1


print(returnPositiveNumber(42))


# results
# <h1>9042</h1>
Now we can modify our factory argument, get back a decorator, which then wraps our function, and finally modifies it’s behavior.
This keeps our program dry, or without repetitive code that is difficult to keep track of. If one thing changes in our program we only want to go fix it in one and only one place. Here is a great article on this topic. Decorators help us achieve this goal when creating software.
Back to our flask app
So now that we know a little bit about decorators let’s look again at a basic flask application:
app = Flask(__name__)

@app.route("/")
def hello():
    return "Hello World!"
What is happening behind the scenes is this (basically):
#credit goes to ains.co
#please read the article on his site it's fantastic
#https://ains.co/blog/things-which-arent-magic-flask-part-1.html

class Flask():
    def __init__(self):
        self.routes = {}

    def route(self, route_str):
        def decorator(f):
            self.routes[route_str] = f
            return f

        return decorator

    def serve(self, path):
        view_function = self.routes.get(path)
        if view_function:
            return view_function()
        else:
            raise ValueError('Route "{}"" has not been registered'.format(path))


app = Flask()

@app.route("/")
def hello():
    return "Hello World!"
We haven’t used decorators in classes, but it’s basically the same except here we call a method inside of the Flask class.
The cool part is the self.routes{}.
Flask is storing each path (“/”) as a key, while the value is the decorator function itself.
It doesn’t go that final level deep to wrapper. In our example we used our modified function right away, but flask is saving this function to be used later in the serve method.
Once we make a request in our browser to the main domain (“/”), flask is going to check if that is in it’s self.routes dictionary. If it is it will return the function that is stored, which is hello().
If this is confusing do not worry. It is ok to just understand the results of the code and get a feel for how flask operates. This is just a look under the hood of the flask engine. Again here is the link if you want to learn (most of) the inner workings.
Getting form values from flask
Since our form action in the index.html <form> is <form action=”/register”… we have to let flask know about this url, otherwise known to flask as a route, and what we should do when the user submits our form to it. So we are sending our form message to that url using the POST method as shown below:
@app.route("/register", methods=["POST"])
def register():
    if not request.form.get("name") or not request.form.get("dorm"):
        return render_template("failure.html")
    return render_template("success.html")
Our function has some logic that guards against the user not submitting the correct values, and finally if the guard is passed we just return the success.html page found in our templates folder.
Some cool is the request object we have access to. This allows us to work with the form values that are specified in the index.html <form> element. These are
<input type=”text” name=”name”…
and
<select name=”dorm”>
using the name attribute we can use request.form.get(nameAttribute) which gives us the value we specify.
Now let’s take a look at the failure.html file to pull apart what is happening.
Flask templating
Take a look at the templates/failure.html file in the froshim0 flask application:
{% extends "layout.html" %}
{% block body %}
You must provide your name and dorm!
{% endblock %}
The curly brace percent symbol syntax is a templating language called jinja2. This means we can write regular html, and when we need an expression like a variable we use the following syntax: {{ myVariable }}. When adding logic (for loops, conditionals etc), we wrap them in the curly brace percent symbol like this: {% logic here %}.
Here is what the failure.html page looks like:
{% extends "layout.html" %}
{% block body %}
You must provide your name and dorm!
{% endblock %}
If we look into layout.html we only see this:
{% block body %}{% endblock %}Because there is nothing between block body and endblock, layout.html is not actually adding anything to our failure.html file.
If we erase the jinja2 lines and leave only the plain text:
You must provide your name and dorm!our webpage result is the same. Run the flask app in the terminal by typing flask run. Go to the webpage that has the form and leave it blank. Then click submit. We should get this.

Now let’s put the jinja2 lines back into failure.html.
Next go back to layout.html and add something like this:
{% block body %}
HELLO LAYOUT!
{% endblock %}
Now when we test the webpage again we get this:

So we don’t see HELLO LAYOUT!
This is because {% block body %}{% endblock%} is a placeholder for any file that extends layout.html. So if failure starts with the {% extends … %} expression that means anything within the {% block body %}{% endblock%} in the failure.html file will appear in the {% block body %}{% endblock%} inside the layout.html file.
Now let’s try adding some html to the outside of the expression in the layout.html file. Try this, save and re-run the flask app by canceling it in the terminal with ctrl-c, then re-running flask run.
Here is layout.html now:
HELLO START OF LAYOUT<br>
---------------------<br>
<br>
<br>
{% block body %} THIS WILL NOT RENDER {% endblock %}<br>
<br>
<br>
-------------------<br>
HELLO END OF LAYOUT
Now things are getting interesting. Every page in our app now has this text we’ve added:


Now we can put pieces of our webpage that repeat on many pages in one place, and extend them using the {% extends …%} method in jinja2.
Storing form data with flask
Flask allows us to access form fields when submitted by a user. Looking at application.py on line 1, we import request. Here is an updated version of our code:
from flask import Flask, render_template, request, redirect

app = Flask(__name__)

# Registrants
students = []

@app.route("/")
def index():
	return render_template("index.html")


@app.route("/registrants")
def registrants():
	return render_template("registrants.html", students=students)


@app.route("/register", methods=["POST"])
def register():
	name = request.form.get("name")
	dorm = request.form.get("dorm")

	if not name or not dorm:
		return render_template("failure.html")

	students.append(f"{name} from {dorm}")
	return redirect("/registrants")
Flask is instantiating the request object when the user goes to a webpage. So If I go to “/” or “/registrants” a new request object is made. This is because of threads and context. Threading means the program is doing several things at once, a good example is one user going to our “/” webpage and another user at a different computer going to “/register.” Each thread has different stuff going on. The context of the request is not the same. So flask hands us back a unique object with values that are relevant to the user’s request.
on line 6 we create a list of “students.” because this lives outside of all our routes and functions it will be saved for as long as we run our flask app. It’s stored in memory.
on lines 21 and 22 we create variables “name” and “dorm” which store the user input from our form. Our request object has a form object inside of it with a get method. This is kind of confusing because it’s not like get and post kind of get, it’s just the “get me the value” kind of get. To clarify:
- get POST request values
- use request.form.get(field name=”thisvalue”)
- get GET request values
- use request.args.get(field name=”thisvalue”)
Finally on lines 24 through 28 we guard against the user not inputing values in our form by checking if either name or dorm return false. If one or both return false in our if statement, we return our failure.html page using the render_template function.
If the user submitted all the form values we use our “students” list and use the append method to add the formatted string to our list. Finally we redirect the user to the “/registrants” page. This confused me because I didn’t realize the app route is going to “/register” and the redirect is to “/registrants.”
So normally we could pass a template using render_template. But I think it makes sense to use redirect to minimize code repetition. If the registrants template file ever had to change you would only have to change it in one place. The template should stay with the route!
Notice line 15 how we have students=students as an argument in the render_template fuction:
@app.route("/registrants")
def registrants():
	return render_template("registrants.html", students=students)
We’re creating a new variable for our render_template so it can access our students list. So the students on the right side is the one that has our name and dorms, while the one on the left is passed to our template. This is where jinja2 comes into play.
Go to templates/registrants.html
{% extends "layout.html" %}

{% block body %}

<ul>
    {% for student in students %}
    <li>{{ student }}</li>
    {% endfor %}
</ul>

{% endblock %}
On line 6 we are using a for student in students loop. The students is the list of student data we passed from our application.py!
Just like any python loop we express a single item in our list but creating a temporary variable, in this case we call it student (singular). Now within the loop we add it to our html list with double curly braces {{ student }}.
We have to end our for loop when using html and jinja2 so on line 8 we use the {% endfor %} statement.
Here is what happens after submitting the form two times:

Don’t forget using app.route doesn’t have to return a webpage! Notice how we don’t have a register.html file in our templates. This is because that route is only being used to process some values. Once we have them we can redirect them to an actual webpage. Each time the user goes to a different address it’s just running a function for us. That might be a webpage, other times it might just be doing some work behind the scenes.
Adding more features to the froshim form
Next up we add an email letting the user know they registered. Of course new features mean new import statements so let’s bring them in:
import os
import smtplib
from flask import Flask, render_template, request
We aren’t using the redirect method so we’ll leave it out this time.
Next we create our app object and the usual route to our root web address “/”:
import os
import smtplib
from flask import Flask, render_template, request

# Configure app
app = Flask(__name__)

@app.route("/")
def index():
    return render_template("index.html")
Then we configure the “/register” route to send a confirmation email to the user:
import os
import smtplib
from flask import Flask, render_template, request

# Configure app
app = Flask(__name__)

@app.route("/")
def index():
    return render_template("index.html")


@app.route("/register", methods=["POST"])
def register():
    name = request.form.get("name")
    email = request.form.get("email")
    dorm = request.form.get("dorm")
    if not name or not email or not dorm:
        return render_template("failure.html")
    message = "You are registered!"
    server = smtplib.SMTP("smtp.gmail.com", 587)
    server.starttls()
    server.login("jharvard@cs50.net", os.getenv("PASSWORD"))
    server.sendmail("jharvard@cs50.net", email, message)
    return render_template("success.html")
Using the smtblib (SMTP library – simple mail transfer protocol) we can log into an email account, and send emails to users through it. Just like you would from your own email account.
Using the os library allows us to use operating system variables and methods from within our program. We don’t want a plain text password in our program, so we can have the os library call it from an environment variable we set outside of the program. I’m using a mac, so in the terminal I would type export PASSWORD=mypassword.
This script doesn’t work without a few changes. Can you try to use your email to send a success message back to the same email?
I had to add the email input in the index.html file, create an environment variable with my email password then update the script with my email address.
Finally google doesn’t allow apps like this to work by default. So do a quick search for allowing less secure apps in gmail to briefly allow the app to send the email to see it working.
Using the csv library
Here is another example where we save the registrants to a csv table file:
from flask import Flask, render_template, request
import csv

app = Flask(__name__)

@app.route("/")
def index():
    return render_template("index.html")

@app.route("/register", methods=["POST"])
def register():
    if not request.form.get("name") or not request.form.get("dorm"):
        return render_template("failure.html")
    file = open("registrants.csv", "a")
    writer = csv.writer(file)
    writer.writerow((request.form.get("name"), request.form.get("dorm")))
    file.close()
    return render_template("success.html")
Getting csv (comma separated values) data can be really handy to users who have to filter data later in a spreadsheet. Python3 comes with a great library for this called csv.
On line 14 we use the open function to create our csv file, and the “a” means we’re going to be writing to the file in append mode, since we are going to add info to the file over and over every time a user fills out the form. We don’t want to overwrite the previous data, which is what would happen if we used “w” or write mode.
The csv class has a writer class that takes in a file handler, and gives us back an object with methods for adding data to the csv. We name the object writer and use the writerow method, passing in the data the way we want it entered into the row. Imagine this is our csv spreadsheet:
| John Smith | Apley Court |
| Jane Smith | Matthews |
Our csv files can be open in a text editor and look like this:
John Smith, Apley Court
Jane Smith, Matthews
Each column is separated with a comma
and each row is separated with a line break.
Back to our program we see on line 18 this is exactly what the writer.writerow function is doing. Pushing in a row of data from the form.
Finally with use the file.close() method, and return our success.html page.
Our .csv file can be opened in Excel. Create a few entries and try it out!
That is it for week 7 lecture notes!!!
Preview into problem set 6
Coming up we’re going to use flask to create a web app that compares strings char by char, or the less comfortable version is uploading two text files and comparing them in different ways. See you in the next one!